Tuesday 8 April 2014

Finally: Studio 3!

The first 4 weeks are over and the more time I spend here at the SAE Institute in Zurich the more I like it and the more I am convinced that I'm doing the right thing now. Whereas back in Innsbruck I never really felt at home or at ease or 100% comfortable in the lecture halls. Here in Zurich it's such a lot of fun that I don't mind working on the weekends till late at night, especially if I get to work with in one of our recording studios, learn new stuff or simply meet talented, interesting and nice people working as audio engineers or musicians. The people I'm working with every day are so relaxed and friendly that I feel like an idiot not having studied at SAE years ago. But as Daniel, one of the supervisors, said: "Everthing that happens to us or that we live through has a reason." and I reckon that I wouldn't have met all those incredible people I have met until now if I had changed studies a couple of years back.

So what happened this week? Quite a lot, some of it expected, some unexpected.

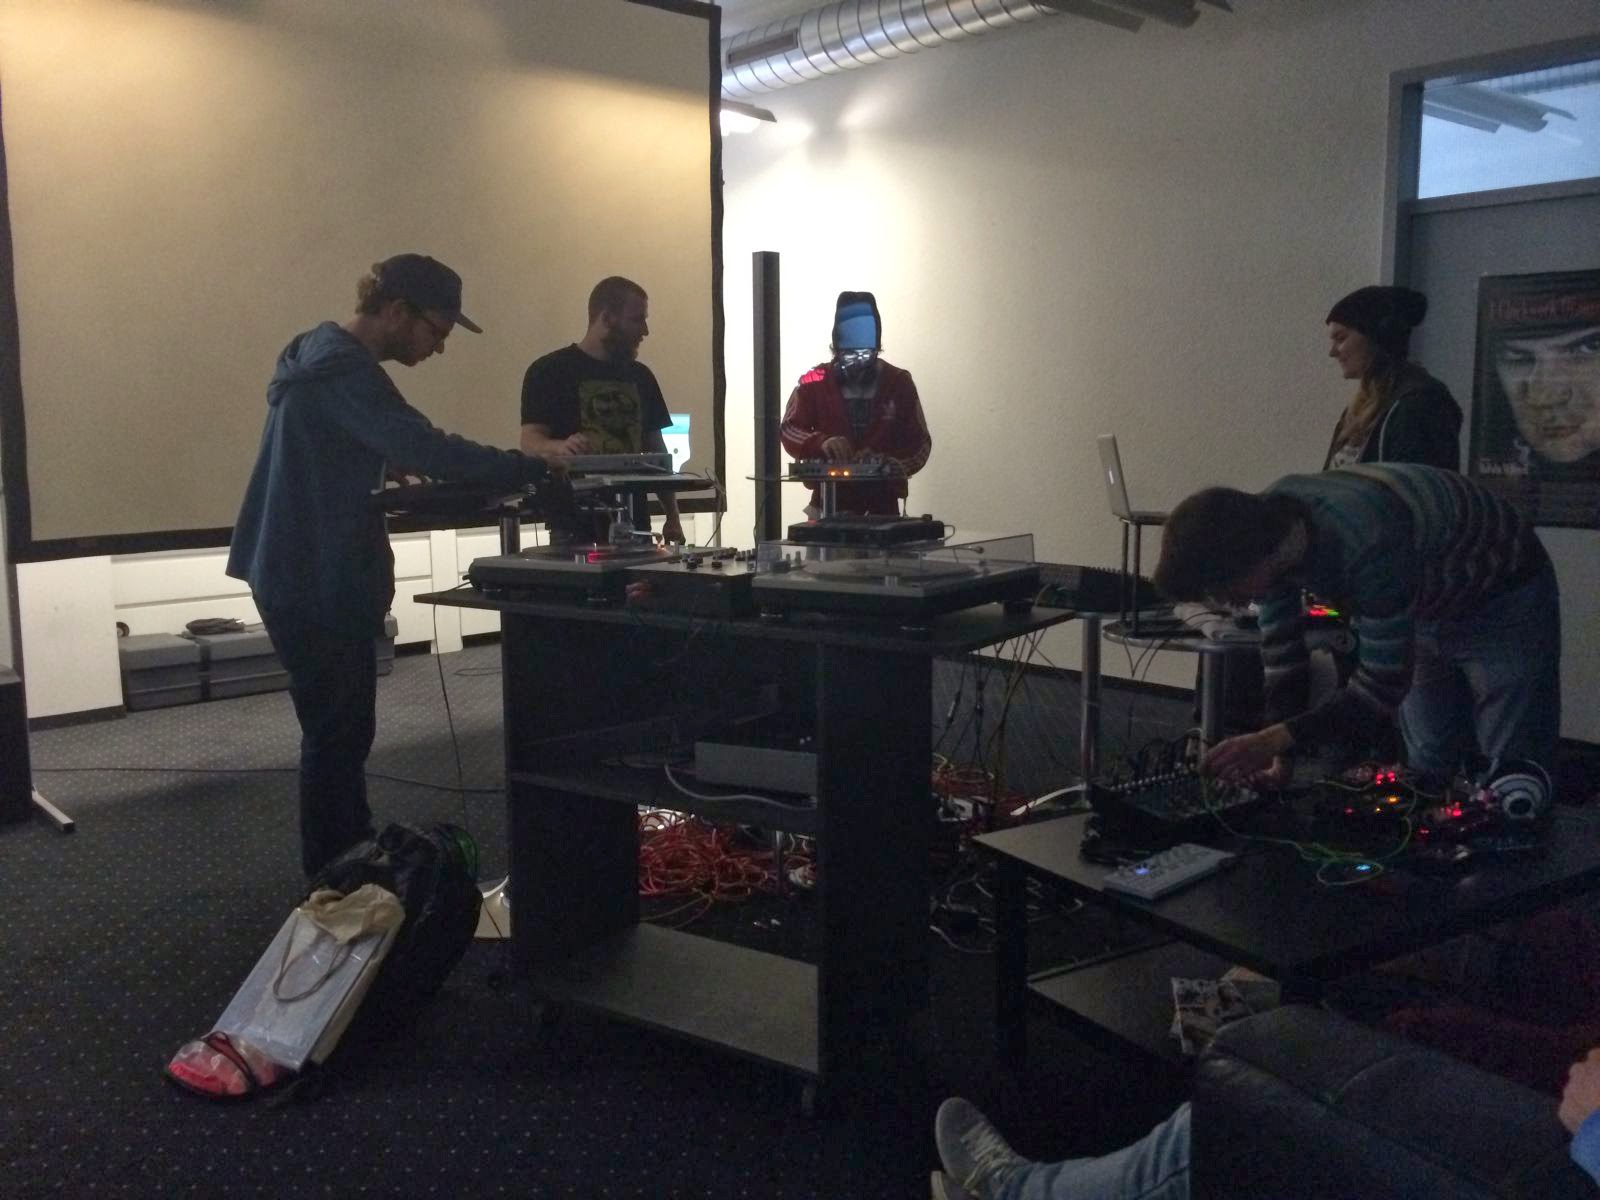
On Monday we had the much longed-for workshop for Studio 3. Much longed-for because after this workshop we were allowed to book and use Studio 3 for any audio engineering-related purposes. It might be the smallest of our 4 recording studios, but it is the first one we students are allowed to use on our own! Michael Feller lead the workshop and he told us about the equipment, the signal flow, what we should be wary of and what we should keep in mind and what we shouldn't do. Well, actually, we started talking about the equipment in Studio 3 the week before in class, with handouts and long explanations.

After the workshop I booked Studio 3 from 3pm to 6pm to practise what we've been taught so far. Equipment-wise I got 2 mics, a radio, headphones and some XLR cables to record a signal (some Swiss radio station in this case). It took me a bit of time to set up the mics and to doublecheck that I didn't do anything wrong, like switching on 48V phantom power before plugging in the condenser mics. I rather check important things like phantom power twice, because the worst thing that could happen is that equipment could be damaged and I don't want that. No, sir, I don't want that at all.
But all seemed to work out quite nicely. The signals came in where they were supposed to. No mic exploded into bit and pieces. The headphones mix ("HP mix" from now on) was good and I even found out how to add some reverb (or any other effect) to the HP mix. Well, it's not that difficult. You *just* have to comprehend how the signal flows and then apply logic. What you get as a result is a small but important revelation.

The fabled Studio 3
Our lecturer on Tuesday was Christian Almer, the audio head instructor and the one responsible for all students of audio engineering at SAE Zurich. Christian talked about it at the very beginning of our studies a month ago and it seemed that everybody forgot about it, but it was time to elect a class representative, because every class needs one and we've known each other for about a month now - a good time to get over and done with it. Upon asking for volunteers only one of my classmates raised his hand. But it didn't seem quite right to me, since an election/a vote consists of at least two candidates. So I raise my hand too after some moments of thinking hard about what I'm about to do. What took place in the next few minutes was wholly unexpected, really. The vote tally was pretty obvious, to say the least: 10 to 1 votes - for me. Honestly, even if my classmates said I was predestined for the job, I didn't anticipate this outcome at all. I thought I might get half the votes, but such an overwhelming number, I was a little bit shocked to be honest.

After this administrative matter was settled we could return to our normal class and the next topic: Entry in Professional Career and everything related, especially the letter of application and how to write it correctly, what to mention in the letter, which documents to add and what to avoid. A very informative couple of hours were to be had and Christian offered that the SAE Institute would check any application if it is correct. 
This is a waveform. Gaze at it in awe!
We've done so much theory the last few weeks and it was time to get into Pro Tools some more. But before we could go in medias res, Michael Feller taught us about waveforms and what they express on Wednesday. And let me tell you, you can read a lot out of a wave's form. For those of you who don't know what a "waveform" is, it is the graphical representation of a digitalised signal. Amplitude, frequency, dynamic, noise, crosstalk, clipping, wrong bits and errors in the waveform - all of those thing can be seen just by analysing the waveform. When talking about a waveform in a software or rather a recording software like ProTools - other software is available - you're not able to avoid two further topcis: sampling rate and bit depth.

The sampling rate (Abtastrate) translates to the time axis and describes the resolution of said axis. The higher the sampling rate the shorter the intervalls between each sampling and the higher the resolution. The bit depth on the other hand describes the resolution y- or value-axis. Most common are bit depths of 16bit (2 to the power of 16 possible value), 24bit (2^24 values) or 32bit (2^32 values). Seems legit, doesn't it?


Thursday was reserved for Pro Tools, especially shortcuts and a basic Pro Tools introduction. Not much to report here. If you have any question, well, you know what to do: write me. =)
Besides the lecture on midmorning I decided to have a look at the next practical exercise: harddisk multitrack editing, or "HD MTK Edit" for short. So, what was this exercise all about? Exactly what the  title says: editing of more than one track. In this case the exercise consisted of a reference track (a complete drum track), a bass guitar track to check the drum tracks and a lot of individual tracks (overheads, kick, snare, toms, floor tom, ...).
I was sitting at one of the workstations in the edit area for quite some time, not because I was fooling around - well, ok, maybe a bit fooling around was involved - but because the exercise just took up a lot of time doing it for the first time. I had to listen to the shorter reference track and the longer individual tracks several times and set a lot of markers which were helping me out a lot, when I started cutting the individual tracks into clips to recreate the reference track. Setting markers and comparing different parts of the individual tracks and the reference track was the most time-consuming part of the whole exercise. The editing itself, cutting and placing the clips in the right order, wasn't that bad and once I had set all the relevant markers and found each part I needed, it was a piece of cake. Mmmhhh, cake, delicious.
Digidesign ICON D-Control - Las Vegas Mode! (Studio 1)

And then there was Friday. As you might know we don't have any classes on Friday. It's more or less the day we use to do exercises or other school-related stuff, if we don't have enough time on the other days. But sometimes there are interesting events or, in this case, workshops. So, on Friday Giulio Wehrli, one of our lecturers, came to SAE from Canada where he is working for a film production company doing, who would have thought, the audio part for different movies. The workshop was a master class about automation and how to use it efficiently. He kicked off the workshop with a short history lesson. The first automation systems were so-called "flying faders" on an analogue mixer. An external computer was connected to this mixer who was just working for the motorised faders via "time coe" (ETC). Later MTC or "MIDI time code" was introduced and after that a system called "Total Recall", which saved potentiometer, EQ, fader and other settings was used.
Today bigger consoles and mixers have their own automation section for each track with all the useful functions, like write (WR), touch (TC), latch (LT), trim (TM) and read (RD).
1. Write (WR)
This mode writes an automation while in playback mode. It is the most basic of all the automation writing modes.

2. Latch (LT)
Latch mode is a bit like WR, but the automation is in RD (read) mode, when the faders are untouched. As soon as a fader is touched, it switches to WR.

3. Touch (TC)
While playback RD mode is active, but as soon as a fader is touched, it switchs to WR mode. If you let go of the fader, it switches back to RD mode and the faders move according to the automation recorded before. This mode is good for correcting a previously recorded automation.

4. Trim (TM)
TM works only in conjunction with LT, TC or WR. While playback RD mode is active. When a fader is touched it switches to TM mode. A new automation curve is written and blended with previously recorded automation. And one thing is also noteworthy: faders don't move while in playback mode.

Besides from having a lot of fun and learning so much at SAE, I found a room to stay in until the room in my future shared flat will be available. Good times!

Well, that's all for today! Cheers!

Wednesday 26 March 2014

BRRRTZZL! Or: How Electrical Engineering Can Be Fun.

Well, it took me a couple of days to get this one up, because there is quite a bit to write and also because there's not much to write. I could write loads and loads about the teaching material, but I don't want to go too much into details of topics that - as important as they are for my future trade - are mainly basics for the function of the equipment we're going to use or are already using, and neither you nor I expect that I teach you what we've learned in 4 days in just a few paragraphs. Where it is important I will try and explain as best as I can though. But I reckon this will be in the future, when we are learning about effects (filters, EQs) and microphones (condenser mics in particular). So, sit back and enjoy the ride.

Wednesday brought a change in our curriculum. We got a new lecturer and we started a new big topic. For 4 days we had the first block of electrical engineering (Elektrotechnik), presented by Patrick Newman, an audio engineer and electrical engineer with a great sense of humour and a very friendly vibe around him. Half of the time he's laughing and cracking jokes and it's definitely a lot of fun listening to him explaining electrical engieering. The somewhat barren subject is quite enjoyable when Patrick humorously remarks what dangers there are when working with electricity and what we should keep in mind. Those kind of lessons tend to stick. That's how  physics and natural sciences in general should be taught: interestingly.

First Patrick taught us about basic stuff - units, definitions and a basic principle to be precise.
1. electrons and their purpose
2. electric voltage/electrical potential
3. electric current
4. electric resistance
5. Ohm's law
6. electric power
7. level of efficiency

But then he went deeper into the topic and we learned about direct current, alternating current, AC voltage and how AC voltage can be describe. Which is pretty simple: through amplitude, period and phasing. But of course, it's not that simple. There are two ways to measure the amplitude: peak value (Spitzenwert) and peak-to-peak value (Spitze-Spitze-Wert). Well, and then there's RMS value (Effektivwert), which is approx. 0,7 times the peak value. After that we went on to the protective devices in electrical engineering: ground/earthing, protective insulation and extra-low voltage.

(1) peak, (2) peak-to-peak, (3) RMS, (4) period

The next big topic which used up the remaining time of the electrical engineering class was "component". Not just any components but 2 very basic and important ones: resistor & capacitor (Widerstand & Kondensator) that are used in various ways in audio engineering through electrical engineering. With two resistors connected in series you can build a "potential divider" which you might know as "fader" and "potentimeter" (or poti). Of course there are also "current dividers", but they are rarely used in audio engineering, so I leave them out.

Capacitors can, like resistors, be parallel- or series-connected, but the formulae are inverted: formulae for parallel-connected resistors match series-connected capacitors and formulae for series-connected resistors match parallel-connected capacitors. So, it's not that bad to do the maths with those components.

There's one speciality all of us will need as audio engineers: frequency-dependent potential dividers (frequenzabhängiger Spannungsteiler). These interesting elements are built with a resistor and a capacity AC resistors (kapazitativer Wechselstromwiderstand). First I have to explain what a capacity AC resistor is or rather does. Normally, a resistor has the same resistance value regardless of the frequency. But this bad boy is different. He acts on the following principle: the higher the frequency, the lower the resistance he puts up. 
You might be asking now, why this is important in our future line of work. Well, it's quite simple. Depending on the setup of those two components you either get a low-cut or a hi-cut filter and you can't argue that those are not important for an audio engineer.

But I won't go into further details. If you're interested, you can find most of those things in a good physics school-book... or all of it at the all-encompassing, omniscient entity called "the internet" and its messiah [enter search engine of choice]. But I have another suggestion: start studying at SAE or become an electrical engineer. *wink*

I hope I'll get to write a bit more, but those electrical engineering basic aren't really fun for you to read and if you had electrical engineering in school or your professional education, you might know this stuff even better than me. So, if I got anything wrong, don't hestitate to shout at me what an idiot I am and how I could make such blatant mistakes. But keep in mind: I was studying law until January of this year and my knowledge of technical shizzle wizzle like this isn't what I wish it would be. But it will change after reading up on this subject. Promise.

Well, that's all for today. Cheers!

GIVE ME FOOD! NOW!

Thursday 20 March 2014

Mix that Mic, DAWg!

Two weeks done, 50 more weeks to go!

As I wrote in the last regular entry we started to learn about mixer consoles last week and I will elaborate a bit what we've learned so far about a mixer console and its components.

Let's start of with its purposes. What is a mixer for? Well, sounds like an easy question to begin with.
1. Summing up the single tracks to one stereo track
2. adjusting the ratio between the volumes of each track
3. frequency editing
4. effects
5. adjusting the balance/panorama or each track
Moving on to the mixer itself and its most important parts.
1. Gain (Eingangsverstärkung)
2. 48V Phantom Power (48V Phantomspeisung)
3. AUX Send
4. PFL (or "Pre", "Pre Fade"; = Pre-Fader Listening)
5. Insert Send/Return
6. EQ (= equalizer)
7. Subgroup Routing (Subgruppen-Routing)
8. Solo Bus (Solobus)
9. Pan(orama)
10. Faders
11. Faders for Subgroups (Subgruppenfader)
12. Control Room Pot(entiometer)
13. Phones Jack (Kopfhörerbuchse)
14. Master Fader
15. Talkback
16. Metering (VU-meter)
Of course, there are more components which differ from mixer to mixer, but at least those 16 components should be present.

We also had a short introduction into microphonics, the last topic on Monday.

Firstly, the purpose of a microphone is to converts fluctuations in air pressure (which we perceive as acoustic noise if the fluctuations are between 20Hz and 20kHz) into electric energy, so that a mixer console has something it can work with. Secondly, there are so-called "directional characteristics". They define in which area (front, back, left, right) a mic records and which frequencies it records in which area.
We've just been talking about 6 directional characteristics, but there are some more. So, what are those 6 directional characteristics?
1. Omnidirectional/Undirected (Kugel/ungerichtet!) [pic]
2. Cardioid (Niere) [pic]
3. Hypercardioid (Hyperniere) [pic]
4. Supercardioid (Superniere) [pic]
5. Shotgun (Richtrohr/Keule) [pic]
6. Figure 8 (Achter) [pic]

All of those directional characteristics have their fields of operation. Some are better for interviews, others work better with certain instruments. It really depends on what you want to record and how the room you're recording in is designed and sounds.

An important distinction for mics is whether your mic is a "condenser" or "dynamic" mic. You could say that this distinction isn't just important, but vital for the lifespan of it.

You might ask, "But Hörlöwe, 'vital' sounds pretty exaggerated. If it really is vital, why is that?"

That's a very good question and I'll gladly answer. Handling a mic incorrectly can destroy it. Simple as that. And if it's a very expensive mic, i.e. Brauner, Neumann, DPA - other expensive mics are available, it will probably gall you to no end.

So, why exactly is this distinction important?

Condenser mics are much more susceptible to vibrations than dynamic mics. If you drop a dynamic microphone, nothing much will happen. Hell, if you drop a dynamic mic from a height of 2m, it would still work fine just like before. But if you drop a condenser mic or just give it too much of a physical shock the diaphargm/membrane inside can go tits up. The microphone would be no more. It would have ceased to be. Expired and gone to meet its maker. Shuffled off its mortal coil, run down the curtain and joined the bleedin' choir invisible. It would be an ex-microphone. So, please, don't drop condenser microphones. Handle them and all other equipment with care.


Mass grave. RIP.

There are certain other differences between those two types of mics. While condenser mics need 48V phantom power, dynamic mics get along just fine without those 48V. Dynamic mics are more resistant to feedback and have built-in impact sound insulation. Condenser mics are more delicate. They can record smaller air pressure fluctuations (quieter acoustic noises), their frequency spectrum is more linear and the resolution is higher. But as I wrote earlier, they tend to break more easily if you handle them incorrectly.

This is just a short summary of what we've dealt with in class. Even so, you can see what the scope of those mics are: dynamic mics feel right at home on a stage, while condenser mics prefer the warmth and safety of a recording studio.

The last topic we touched on Monday was "interfering influences while recording with a microphone" and this concerns ALL directional mics, not the omnidirectional though. Oh, and dynamic mics compensate for those influences pretty well.
1. Proximity (Nahbesprechungseffekt)
Proximity effect comes into play if you get to close to a mic while speaking. The nearer you get, the more pronounced this effect will become. What's happening there? The bass or lower frequencies get boosted because the mic picks up in-phase sound in front of and slightly out-of-phase sound behind it.

2. Wind & Plosives (Wind & Explosivlaute wie P, T, K, ...)
Rushing of wind, plosives and other wind-related noises can disturb a perfectly good recording session. The most common way to prevent that is a pop filter or windjammer. Just place it in front of or over the mic and all's well that should be well.

After school we went to grab something to eat and since I wanted to do the first exercise today my lunch break was quite short. I started with my first "mini mixdown" where I had to mix 8 tracks. Getting the volume of each track in a good relation to the other tracks was the fist big task. After fiddling about with the gain pot and the faders I decided to send the drum set to a subgroup and all the string instruments (3x guitar and 1x bass) to a second subgroup, so I could simply raise the volume of each subgroup, since the relation among the tracks of each subgroup were good. Next up was the EQ. I took my time adjusting the EQ for each track, looking for frequencies to be brutally cut or gloriously boosted. Effects-wise I just used a vintage phaser for the bass guitar and two out of three guitars. I applied some final touches with some reverb and panning of the tracks. Voilà, the first mixdown was done... and now Supervisor Marco made his appearence and had to listen to what I mixed. Well as expected, some errors were made, especially a routing error. I double-routed some tracks via main L/R and via a subgroup, which boosted the volume of those tracks. But I also got praise for my choice of effects and the rest. I haven't done too bad for my first mixdown, if I may say so myself. But it was far from perfect and I still have a long way to go to become a good audio engineer.


Tuesday was the day of the "Recording Systems" or DAW (digital audio workstation). Michael explained in depth the two different recording systems that are in use today and that DAW is a very vague term, which only means a transducer with memory/storage and editing possibility. The two main recording systems are:
1. Standalone systems and
2. Computer-based systems
Standalone systems have a very sturdy casing and are extremely reliable. The software running this system is stripped down to a bare minimum to ensure maximum stabiliy. Plus, they are easy-to-transport.

Then there are the computer-based systems which are basically computers (Mac, PC, Linux) and maybe additional hardware. They can be divided into native systems and digital signal processing-based systems. Native systems run on a computer's CPU power alone, making it very resource-consuming. DSP-based systems require further hardware, either internal or external. It's a special hardware just to support the host computer and processes all signals. The computer is just using its computing capacity to display the GUI. The latter of the two systems is more reliable.

Besides that he explained some terms that have to do with recording systems:
linear/non-linear and destructive/non-destructive recording, audio interface, sequencer software and latency and how to avoid it through direct monitoring & buffer size. But that's something for you to look up. If you want to know more, leave a comment. =)

And Tuesday was, of course, aural training day. I started CD #4 and guess what the exercises were about. No, not frequencies. Well, not really. Who said "effects" just now? You! Yes, you over there! You're right. Effects were on today's agenda again. I should mix in some frequency exercises. It would make for a nice change and I would do better in the drill sets that involve the effect "equalization". Either next time or next week. I'll see.

Well, that's all for today. Cheers!

Monday 17 March 2014

Wow. Such Weekend. Much Fun. Doge Approve. Wow.

Weekends tend to be a bit dull, if you're in a new city and don't know enough people there yet. So, on Friday I decided to do the next aural training unit and to have a looksies at our main DAW, ProTools.

The last batch of exercises on CD #3 were again about different effects and pinpointing them in A/B drills. Same exercise, different day. I won't bother you with more details about it. Unless you want me to.

After aural training I messed around with ProTools for a bit and tried editing a practise file with speech. What I saw and used was pretty intuitive and except for using the wrong tools the result was okay. Not anywhere near great, but okay-ish, sort of. Well, learning by doing or trial & error, what did you expect? Failing until you succeed. But this day's supervisor Marco helped me out a bit and showed me what I've done wrong. Mental note to myself: don't use the loop tool, not even by accident, if you want to trim a clip.


A pack of wild ProTools stations appears!

Saturday was pretty exciting, even though it started out without being anything special. Sleeping long, feeding the bearded dragons some fresh salad and just waking up in general. Around noon I wanted to have another go at ProTools, but this time I would use the right tools and think about what Marco told me the day before. As you might expect the result was different from Friday's mucking about with ProTools. I was already much faster with editing, since I had an inkling of what I had to do, and I took my time to do better crossfades, fade-ins and fade-outs. Working on the breaths and breaks was something I focussed a bit to get them to sound natural and believable. 

In the end, the outcome was a lot better than the last. Not something I would send a radio station, but for using ProTools for the second time I'm content. Well, no, not really. One should never be completely content with what one has been doing. Having a critical point of view of one's work and just trying to do better than the last time is the only way to become better. I apply the same principle when learning and practising an instrument, because the moment you're content with your own skills you stop being critical about said skills and as a result you stop becoming better. It might sound obvious and, let's be honest, it is, but most of the time the most obvious answers are the hardest to spot. Ever heard of Ockham's Razor or Lex Parsimoniae? It's a similar principle. Google it, if you've never heard of it.


Button goes in! Button comes out! Button is stuck.


While working with ProTools I heard some nice electronic music coming from another classroom and then from the lounge, but I wasn't done in the Edit Area. After finishing what I set out to do I was curious as to what was going on over there and I moseyed over. A couple of students and our superviser Daniel rigged up some synthesizers, a drum computer, turntables, a Tractor Kontrol, some Korg monotrons and a mixer and were having a small electro session because they completed the Electronic Music Producer course on this very day, presentation of the certificates included. Celebrations were in order. 


Less light, more sound!

But I wasn't just there listening to the soundscapes and beats they created. Daniel asked me if I knew how to operate the mixer and since I used to operate our small on-stage mixer when I was playing concerts with my band »Spielleyt Ragnaroek« I dared to do it. Besides it being a lot of fun, I could try and apply what we've learned and practised (aural training) up to now and gather some experience in mixing in a live situation without embarrassing myself too much if I did anything wrong.

Time flew by and one after another graduate left because it was some hours past closing hour. So, what else was there to do? Righto! Getting a drink as a finale for this day. And thus, with the last three graduates, Daniel and myself grabbing a drink before heading home, ends this tale. And they all lived happily ever after. Or something like that...


DOGE APPROVE. WOW!

Sunday 16 March 2014

More Physics is Effectstastic!

On Wednesday we continued where we left on Tuesday: sound propagation in air, especially in a diffuse sound field. Four very distinct possibilities exist here:
1. reflection (Reflexion)
For a surface to reflect sound it has to be acoustically hard (smooth and hard) and the angle of incidence is the same as the angle of reflection.

2. absorption (Absorption)
Absorption takes away sound energy, either by converting it to warmth (absorbers made from foam), by converting it to kinetic energy and warmth (bass traps/Membran- und Plattenschwinger) or through so-called "Helmholtz-Resonatoren".

3. diffraction (Beugung)
Sound waves can travel around obstacles, but it depends on the wave length and the size of the obstacle.

4. rebounding (Brechung)
Sound waves change the direction of propagation if they transition into another medium, i.e. air to metal.

Welcome to SAE Zurich! You are here: Lobby.

 Next up was sound localisation, which can be differentiated into:
1. left/right localisation
This type of localisation is very accurate. You can hear deviations of approx. 3° from the centre. Because the sound waves don't hit both ears simultaneously, there are differences for both ears in level, phase and timbre.

2. up/down & front/back localisation
Levels and phases don't have any impact here, since the sound waves reach both ears at the same time. However, two factors are relevant: the form of the outer ear and experience/expectation.

3. perception of distance
Perceiving distance solely by sound is nigh impossible and is described as "very inaccurate". It works better in rooms (through reflection).

After that we took a quick look at what rooms a recording studio would ideally have and what is important in those rooms. Just to mention to rooms: control room, recording room (live 1), drum booth, vocal booth, control room just for editing, computer/machine room.

Wednesday is, of course, also "aural trainig day" and since I finished the first two CDs I was excited to start with the third one which introduced "A/B drills". In an A/B drill you have to listen to the original example A and the changed example B and then you have to find out what the change is. The third CD deals with effects and to train recognising different effects the effects got divided in 6 categories (amplitude, distortion, compression, equalisation, stereo and time delay/reverb) with 31 possible changes. Oh boy, the fun I'll have mastering this... =)

Be vewy, vewy quite. We're hunting effect.

Rise and shine! Thursday was effects day. Our lecturer Michael introduced us to effects and outlined the 4 main categories and its most important effects.
1. time processing effects
As the name suggests these effects manipulate the time element. Examples of such effects would be delay, reverb, hall, chorus, flanger, phaser and stereo enhancer.

2. dynamics processing effects
This kind of effects have a big impact on the dynamics (difference between the loudest and the softest sound) and can either extend or reduce the dynamic range. Typical dynamics processing effects are complressor, gate, limiter, expander or de-esser.

3. frequency processing effects
Effects of this category bring changes in the frequencies, i.e. filter, EQ or audio crossover (Frequenzweiche).

4. special effects
Effects that can't be lumped together in any other category end up here. Only the biggest, the baddest and the most notorious effects are part of this group, like distortion, tune pitch, frequency shifter or harmonizer.

Lastly we started learning about mixer consoles and what the console itself and all the knobs, buttons and faders are for. But I'll elaborate this at a later date.

Well, that's all for today. Cheers!

Artist Spin2Win featuring Carpet Floor!

Wednesday 12 March 2014

Week Two - Engage!

The second week of our audio engineering studies started as good as the last week ended. We continued speaking about hearing damages on Monday. The Incredible Tinnitus made his return once again, accompanied by his evil cousin Sudden Deafness (Hörsturz, Ohrinfarkt or Managerohr).

But a big new topic arose: oscillations, which can be described as "maximum displacement from equilibrium repeating itself in certain time intervals", which sounds awfully complicated at first, but believe me when I say it is not. Inherent to this chapter in audio basics are the parameters to describe oscillations, of which there are 5:
a) main oscillation type (sine, saw, triangle or square - hybrids are possible but not relevant as of now)
b) frequency
c) amplitude
d) cycle duration
e) polarity (phasing/"Phasenlage"). 

Lo and behold! The same edit area but from a different angle.

The next big topic we addressed and discussed were the different kinds of crosstalk between two frequencies. We started with something easy, superposition of two identical waves (same frequencies, amplitudes and polarity/phasing). The result is quite unspectacular: the consequent wave is the same but louder by 6 dB. This is the maximum in amplitude a wave can gain by doubling it with an identical wave. So, take two waves with 100Hz & 10dB each for example and what you get is a wave with 100Hz & 16dB. Logarithmic scales are the secret when talking about absolute loudness. If we're talking about perceived loudness a gain of +10dB is needed to double the loudness of a wave. You'd have to nearly triple a wave to get the desired result. I want to point out once again, that this is for the PERCEIVED loudness, not the absolute or physical loudness.
The next kind of crosstalk was as easy as the first one: wave cancellation. This happens if you have two identical waves but the polarity of one wave is reversed by 180°. As the name suggests both waves cancel each other out. The wave has ceased to be. It has gone to meet its maker. It is an EX-wave. Nothing will remain of both waves if the polarity of one wave shifts by 180°. 
 The second last kind of crosstalk was "polarity shift" (all shifts, but 180° or 360°!) which results in some cases in massive changes in the sound. It would be too much to explain it all. As cool as a blog about sound/acoustic physics would be, it's not what I set out to write.
The last crosstalk is called frequency modulation or beat ("Schwebung"). This happens when you have two waves with different frequencies, i.e. 100Hz + 105Hz. What you get is a constant change of constructive and destructive polarity, meaning some frquencies are boosted some are cut and this changes permanently as time goes on. What you will hear is a kind of wibbly-wobbly that accelerates if the difference in frequencies increases. If anyone of you is playing any kind of instrument with a drone (i.e. bagpipes, hurdy-gury, ...) you know this sound. If you don't, switch on your drones and try tuning them for Cthulhu's sake!

After school I did the next aural training unit. And you can guess what it was about. Did I hear "frequencies" in the last row? Right. Frequencies again. Pinpointing one out of 10 possible frequencies and whether it is boosted or cut is something I need to practise some more. But as they say: no one masters anything without hard work. And that's what I'll do: work hard so my not-to-shabby hearing will become better.


This is where aural training takes place. A comfy couch.

Tuesday started out pretty relaxed. The first topic was "different auditory events". Since I don't know the correct English terms for the six events I'll just give you the German ones:

1. Ton
A pure sine sound with just one frequency. A "Ton" doesn't occur in nature at all.

2. Tongemisch
Sound comprised of two or more "Töne", but then again: pure sine. Nothing else. For example: 100Hz + 147Hz, 100Hz + 231Hz + 387Hz, ... . You get the idea.

3. Klang
"Klang" is a special type of Tongemisch and has a harmonic spectrum. Its ingredients are: 1st harmonic (or fundamental) and several other harmonics (or overtones), which are multiples of the 1st harmonic/fundamental, i.e. 100Hz (1st harmonic/fundamental) + 200Hz (2nd harmonic) + 300Hz (3rd harmonic) + 400Hz (4th harmonic) + 500Hz (5th harmonic). Instruments always produce "Klänge".

4. Klanggemisch
A Klanggemisch is, as you can possibly imagine, produces by mixing two or more Klänge. They don't have to result in a chord. Soeven the combination of C + C# + D is a Klanggemisch.

5. Geräusch
This is a special kind of Tongemisch with a continous spectrum, i.e. you have a sound with 500Hz as the lowest frequency and 12kHz as the highest frequency. A Geräusch contains ALL frequencies in between 500Hz and 12kHz, usually with varying amplitude.

6. Rauschen (or "noise")
Again a special type of Tongemisch with a continous spectrum, but with ALL audible frequencies (20Hz-20kHz). There are different kinds of noise, but the most important ones right now are "white noise" (all frequencies have the same amplitude) and "pink noise" (every octave/doubled frequency is cut by 3dB).
Following this block our teacher Michael introduced us to "waves", what waves are and how we could calculate the wavelength. Just to sum it all up: waves describe the propagation of oscillations in an elastic medium. The speed of sound is quite vital for this and we've learned that the density of a material, the temperature and even humidity and CO2 content have more or less influence on the speed of sound, which is important if you're working at a big open-air festival.

Lastly we started learning about sound propagation in air. To start with there are two types of sound fields:
 - free sound field and
 - diffuse sound field.

Let's take a quick look at the free sound field. In a free sound field there are no obstacles for acoustics noises whatsoever. Sound can propagate freely. As with the "Ton" it doesn't occur in nature, because there are always some obstacles. The closest you can get in nature is a snow-covered area. If you've ever been to the mountains and stood on such a snow-covered area, you have surely noticed how hollow and strange everything sounds.

Next one. The diffuse sound field is what you usually encounter in your everyday life. As I wrote above sound always encounters various obstacles in its path, i.e. people, lamps, desks, chairs, trees and so on. Because of those obstacles, the material they are made of, their size and various other factors certain interesting things happen. To be precise those things are: reflection, absorption, diffraction, rebounding and interference (Reflexion, Absorption, Brechung, Beugung und Interferenz). But I will talk about those in my next entry.

Well, that's all for today. Cheers!
Yer poking fun at us audio engineers, laddie? =)

Sunday 9 March 2014

First Week - check

Thursday brought more audio basics. Well, not just any old basics but the real deal: how does our sense of hearing work on a mechanical level? How does a difference in sound pressure level becomes an impulse for the brain? What are all the parts responsible for this procedure? Beside the mysterious workings of the ear we found out about its limits. 

First there is the limit constituted by the frequency range, which reaches from as low as 20 Hz to 20.000 Hz (or 20 kHz). The acoustic region below 20 Hz is called "subsonic noise" or "infrasound" and above 20 kHz "ultrasonic" pitched its tent.
Fun fact: Did you know that the supermassive black hole in the Perseus clusters emits sound? It does and it rumbles away with an astonishingly Bflat 57 octaves under middle-C. This is the deepest note ever detected from an object in the Universe! Kudos to you, mate!

The second limit is the sound pressure level (SPL for short) which is related to the volume of a sound or noise. Our sense of hearing is a very finely tuned apparatus and can only cope with differences in SPL of 0,00002 Pa ("hearing/auditory threshold", HL) and 20 Pa ("threshold of discomfort", TD). Below or above those limits we just don't hear anything. Last but not least we were starting to learn about hearing damages, with age-related hearing loss leading the way and the famous "tinnitus" following in its wake. Still missing in action and expected to appear on Monday: auditory trauma.


After school Tom, Tosi, Sina (a friend of Tosi) and I went to grab a drink at Turbinen Bräu, a local brewery with some excellent beer, if you can believe my classmates. Since I don't drink any alcohol, I got a "Gazosa", a grapefruit flavoured lemonade from Ticino. If the beer is as good as this lemonade is, it must be overwhelmingly good.

But Thursday was also the day I moved from Winterthur, where I was staying for a couple of days with two friends of mine, Tamara and her husband Christian, to Zurich. A friend of mine, Thiago, and his partner Gregor went on vacation to Brazil to Thiago's home town and in exchange for living in their flat for about a month I volunteered to look after their pets: 2 bearded dragons and a couple of snakes. Luckily, it's not scorpions and spiders. =)


Friday was the first day I could sleep long. And so I did, until 10am - with a short intermission at 0730am to switch on the light for Thiago's bearded dragons. After some faffing around in the morning I went to SAE around noon to do some aural training again. After the disillusionment of the last units I didn't expect much. There are still rogue results going about, stabbing my yet average to good scores, but it was better than last time. Aural training is pretty taxing, even if it's just one hour. But it is concentrated effort you put in during the whole of this hour and after a time the sense of hearing tires out. So, after completing the training unit I decided to grab a book from our school library and relax a bit in the lounge area. One of the deep, soft leather couches immediately invited me to sit and stay there for another hour and to have a drink. I like those kind of invitations.


Something else happened on Friday, which makes me very happy. I found a room in a shared flat! One that I would have liked to stay at too! With nice flatmates, a big room, roof-top terrace to have a barbeque on and lots of musicians in the whole house. Seems like stuff finally seems to work out.

Well, that's all for today. Cheers!